Sunday, June 23, 2013

How to Cut or Trim Your Bangs


kawaii bangs
Photo credits: hairstylesweekly.com

          Having bangs is really kawaii but in the long run it can become quite troublesome. You'll have to go to the salon every few months just to have it trimmed. I think it's such a waste of time, not to mention, money. Why have it cut with a fee when you can cut it yourself for free! Plus, it's super easy to do. All you'll  need a pair of scissors. No special hair cutting skills and experience is needed. You can also do this technique if you don't have a bangs yet and want to have one.

Steps:

1. Determine your desired bangs length.
    I always cut mine below where my eyebrows are. For those who will have bangs
    for the first time, try visualizing yourself with bangs because once you cut your hair
    there's no turning back!

2. Comb your hair to the front of your face and gather your bangs or a portion of your hair.
    Tip: Grab hair in an imaginary triangular area above your forehead.

How to cut your own bangs
Photo credits: womens9.com

3. Pull and twist the hair once
    Twisting the hair will make your bangs arch towards your temples.
    Tip: Make sure that the hair you're working on is in the center of your face.
           Make your nose as the reference. 

How to cut your bangs
Photo credits: ©Rino Jasper, beautyideas.com

3. Cut
    Tip: Snip it straight and a bit longer than your desired length
    For those who are new to bangs, try not cutting it short at once.
    You can repeat the steps a few times until you get to your desired length.

4. Pull hair upwards and cut your with your scissors at an angle.
    This will make your bangs not look like a block of trimmed hair over your forehead and
    give the hair nice feathered ends. 

how to cut bangs
Photo credits: womens9.com

Thank you for reading and I hope that this tutorial was helpful.


Stay kawaii! ♥

Saturday, June 22, 2013

Product Review: Hanskin Glossy Magic BB Cream


     BB cream or blemish balm cream is a hailed beauty product. It was formulated by a German dermatologist, Dr. Christine Schrammek and became extremely famous in Japan and Korea. It has become my favorite cosmetic product because it is an all-in-one make-up package. In this post I will be reviewing a BB cream by a famous Korean brand, Hanskin.

     My view of this product is based on my skin type which is both sensitive and oily with a few blemishes.


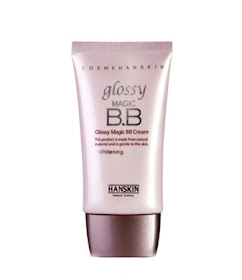
Hanskin Glossy Magic BB Cream

Hanskin glossy magic BB cream

Available in 35mL (upper picture) and 43.5mL (lower picture)
It's just weird that the front print of 35mL bottle says whitening and wrinkle
while the 43.5 only says whitening.

BB Cream


Korean BB cream


   Hanskin Glossy Magic BB Cream Ingredients

     I have made a little research on the benefits of the major ingredients in Hanskin's Glossy Magic BB Cream. First off, chamomile. Studies have shown that chamomile has anti-inflammatory, anti-bacterial, anti-allergenic and sedative properties. This can really help in reducing the redness of pimples as well as prevent new breakouts caused by bacteria. Aloe Vera is used in cases of burns and eczema because of its moisturizing properties. Good for keeping the skin hydrated! Purslane can nourish skin because it is rich in minerals, vitamin C and omega-3 fatty acids and soybean extract have anti oxidant as well as skin lightening properties.

How to apply BB cream

      This BB cream claims to whiten skin and prevent wrinkles. My little research on the components of the cream makes me believe it so. That’s some good start off points.

BB cream

     What I bought is a 35mL bottle. The packaging is simple; white plastic tube and pastel pink-colored cover.

BB cream

       The cream is bit runny but this is not a downside. It actually makes the cream easier to apply and blend. It has a light scent which is what I like about it. I don't like heavily scented cosmetics. The cream evens out the skin tone and finishes off with a glowing shimmer. I love how dewy and shimmery the face looks after applying the cream. Though this does not a good thing for my skin type, I still think that this is a positive point. I find that it also makes the skin feeling smooth after application. My skin is really sensitive and is prone to breakouts but this product did not cause me any pimples.

BB Cream

     On the other hand, this BB cream does not have SPF which is rather important in preventing premature skin aging due to UV rays. It also has a light coverage which made me need another layer of concealer to hide my imperfections. It is only available in one shade so it won’t be suitable for other skin tones. I guess I’m lucky enough that the color shade of the cream matches my face. The dewy and shimmering finish does not really compliment a hot or humid weather. If you have the same skin type as mine, the dewy finish is a no no but you can always apply a light dab of powder.That's what I do anyway.

Here’s a run-down of the things that I like and I don’t like about this product.

Positive:
♥  Skin whitening
♥  Anti-wrinkle
♥  Easy to blend
♥  Light scent
♥  Makes skin dewy and looking hydrated
♥  Frost finish
♥  Did not cause me pimples

Negative:
■ No SPF
■ Light coverage
■ Only 1 shade available - not suitable for all skin tones
■ Does not compliment oily skin
■ Not suitable for hot and humid weathers

     I highly recommend this product preferably to those with normal to dry skin. I find the hydration superb and the dewy look would definitely suit these skin types. I would still recommend this product to those with a combination skin type like mine (oily and sensitive). It did not cause me any breakouts and I just finish my face off with powder to tone down the dewiness. Though it has some negative points, I think that the positive still outweighs it.


Disclaimer: Please do not solely rely on the information I gave. This review is purely my thoughts and experience in using the product. You should always check the product yourself and consult with your dermatologist.




Wednesday, June 19, 2013

How to Temporarily Color Your Hair


colorful kawaii hair
Photo credits: tokyofashion.com

     Show of your creativity and pump up your kawaii look by coloring your hair in outrageously kawaii colors! 

kawaii purple hair
Me with purple hair
 
     Unfortunately not everyone can get this done because of school policies or the fear of permanently damaging the hair. But in every problem, there is always a solution. And in this problem, the solution is:

HAIR PASTELS
 also known as hair chalk. 

hair pastel
 
     I've found this item on ebay. They can come in a set of 12, 24, 32 and 48 colors. WOW! That's a lot of colors right? The possibilities are endless!

hair chalk

I got the 24 color set and as you can see, that's a lot of color choice!

temporary hair color chalk


          I would like to make a separate post on a tutorial and a review about this product so that's all for now. Thank you for reading.


Stay Kawaii!

Kawaii Socks

I love wearing socks! It keeps my feet warm during cold weather and prevents callous formation which can be caused by some shoes. Plus, it's a very good fashion item!

Here are some of my favorite kawaii socks.

Kaero-san socks

Real frogs scare me but these frog character socks are bursting with adorableness!

kawaii socks
Niwatori character socks

Who says that chickens are only good for eating? They can be cute characters too!
 
kawaii socks

I love how the chicken noses are red and puffy.

kawaii socks

You can't wrong with an adorable pair of socks.


Stay kawaii!

Tuesday, June 18, 2013

Kawaii Cellphone Cases

With you being kawaii, you can't leave your phone looking plain and sad.
Here are some lovely cellphone cases I saw in SG Chinatown.

 Look at that humongous Hello Kitty!

 kawaii case
I'm not a fan of fur but these faux fur cases looks so chic, not to mention the leopard print ones below.

decora case
These would be my favorites! Who doesn't love decora cases??? (I hope you don't!)
They looks so KAWAII!

hello kitty case
This one is a jewel hello kitty case with a big bow. 
Sorry if the photo is blurry. My hands failed to be steady. My bad.

The only problem that I get with this kind of cases is when they start chipping off. No matter how much you care for them, they will eventually wear and tear,

skull case
Just like this case that I have.

It started peeling off and some of the jewels started disappearing too!
 ヽ(´□`。)ノ

Decora iPhone case
I'm currently using this black and white jewel case for my phone.

Others say that these kinds of cases are so outlandish and one should just opt for the plain hard or jelly covers. I say it's nonsense! If you can beautify yourself, what more your phone?

Thank you for reading! Stay kawaii!

Monday, June 17, 2013

Make a Purikura (プリクラ)

Purikura (プリクラ) is a type of photobooth popular in Japan where you can add different decorations on your photos. Purikuras are so kawaii and you can stick them in your notebooks, scrapbook, cellphones or wherever. Unfortunately, the common photobooths you can find in other countries (including where I live) doesn't give you that KAWAII factor purikura booths give. o(╥﹏╥)o

Luckily there's a website where you can make purikura like photos! Plus it's FREE! Yey! It's called

Purikura maker

Puricute offeres a huge array of stickers and borders you can use to decorate your photos. They're all cute and the site really lives up to its name, puriCUTE! ☆*:.。. o(≧▽≦)o .。.:*☆

Get started with your purikura by going to their website and signing up for an account. 

Online purikura

Online purikura

You can skip the sign up and directly edit your photos by clicking the "make a puricute" button. But I suggest you don't because aside from editing your photos, Puricute is also like an SNS. Making new friends doesn't sound bad at all, right?

After signing up, you can now edit your photos by clicking on the "make a puricute" button located at the upper left corner of the website. 

Online purikura maker

After which, you'll have to browse from your computer the photo you want to edit.

Purikura

Start editing! You can put frames, stamps and write on your photos using the pen tool.

Purikura photo editor

Click done and there you have it! A kawaii purikura.

Purikura online

You can save your purikura to your computer, send it via email or share it to different websites. Puricute also gives you the code of your edited photo so that you can embed it in your website. (°∀°)b

That's all for now kawaii lovers! Thank you for reading and have fun making your own purikura!

puricute purikura


Saturday, June 15, 2013

DIY Nekomimi (Cat Ears) Headband

One of my headbands started falling apart. Boo! 。:゚(。ノω\。)゚・。
But I thought that it would be such a waste to throw it away so I completely dismantled it and decided to give it a new life by making it into... -drum roll- 

cat ears headband

Yes, yes! A nekomimi headband! 猫 (neko) meaning cat in Japanese and 耳 (mimi): ears. The end product is very cute and it's amazingly easy to make! (=^-ω-^=)

Here's what you'll need:
1. Old headband or a plain new one
2. 12 gauge round sterling silver wire or craft wire
3. Needle-nose pliers
4. Super glue
5. 22 gauge round sterling silver wire or craft wire
6. Your choice of decoration (beads, ribbon)

diy cat ears headband

Steps:
1. Cut 2 pieces of 12 gauge wire for the ear frames. You’ll need about 5 inches each piece.
2. Bend both wires to look like an inverted V and lay it out along the headband.
    Tip: Mark the position where you want the ears to be.
3. Cut excess wire and loop the ends of both wires.
4. Secure the ear frames in position using the 22 gauge wire.
    Tip: Use the needle-nose pliers to coil it inside the loops. Make sure that you coil tightly or else the ears will just be sliding along the headband.
5. Decorate. You can use pearl beads, crafting gems, ribbons, anything you want. In my case, I wrapped the headband with ribbon.
6. Secure decorative articles with super glue.

cat ears headband

Thank you for reading and I hope that with this tutorial, you'll be able to give your old headband a new life or simply make a new kawaii accessory.

cat ears headband

Thursday, June 13, 2013

Ulzzang Inspired Gradient Lips Tutorial

I have been using gradient lip makeup technique for quite a while now. This style became very popular among ulzzangs last season but I’m still not over this style! I love how it makes the lips look soft, glowing and doll-like.

What you’ll need:
1. Lip balm or lip primer
2. Lip concealer or nude colored lipstick
3. Cherry red lip tint
4. Light pink lipstick (optional)
5. Clear or peach colored lip gloss

ulzzang gradient lips

Here are the 6 simple steps that I do to achieve the look:
1. Apply a light layer of lip balm on lips.
2. Make your lips pale using a lip concealer or a nude colored lipstick. In my case, I use a concealer.
3. Apply cherry red lip tint on the inner center of the lips.
4. Spread evenly using a lip brush or your finger.
*** Apply light pink colored lipstick over the tinted area. This step is optional but I find this very helpful for the next step. It also creates better gradation.
5. Blend the color from the inner to the outer lips using an upward motion for the upper lip and downward motion for the lower lip.
6. Apply clear or peach colored lip gloss to finish.

gradient lips tutorial

Thank you for reading! And I hope you find this tutorial helpful.

Saturday, June 8, 2013

Purple Yam


purple hair

purple hair

 tattoo tights and creepers

Purple hair, chiffon dress and creepers.

I can't seem to get enough how wild and cute hair colors have become. It intensifies your look and make you achieve a higher level of creativity. So in this look I'm sporting a purple hair. I think it's both cute and edgy. I'm wearing one of my favorite chiffon dress. It's very simple, comfy and kawaii! I'm also wearing tattoo tights with cat print and white frilly socks to tone down the creepers. I clipped small pink ribbons to the ties of my shoes to give it a kawaii touch.


Monday, June 3, 2013

Creepers

Creepers
Finally! My very first blog entry and my very first...


<TA-DA> creepers! ☆*:.。. o(≧▽≦)o .。.:*☆ I got this a few months back.

 creepers
  (。♥‿♥。)

I first saw creepers being worn in Harajuku street fashion. Back then, I was still confused whether I actually love or hate it. It looks so chunky and seems a bit heavy. I imagined myself looking like a clown if I wear one.  

Eventually, I realized that I actually LOVE it! But unfortunately, creepers has very little to no availability in the country where I live. (。┰ω┰。) My only choice was to buy it online which was really expensive so I had push my feelings of love aside and forget about having a creepers. 

A few months later while I was looking around a thrift shop, my eyes instantly caught a shoe full of sole. It was a classic looking creepers! I instantly fell in love with it but I did not buy it immediately. I still waited for a week to test my love. It never wavered so I finally bought it. 


creepers
Creepers and gray socks

I'm currently very happy with it and I wear it almost every time!


creepers
  Happy three friends

 My creepers along with my classic 1960 Doc Martens and VANCL Boots.